If you have been doing yoga for a while, you will agree on its benefits on both physical and mental balance. Although we know yoga is “good” for us, there are periods where our practice gets irregular: too busy with work, family matters, traveling, and other life events. No matter where you are or what is happening in your life, a regular home practice can be a strong pillar for everyday balance – even in a short amount of time. A home practice is also a necessary step to deepen your yoga practice.
In this post I present my humble opinion about how to build and maintain an effective, regular yoga practice that can support you throughout your day.

A clear setting
Before you start, take a moment to clarify WHY you want to have a yoga practice at home: What are your intentions? What would you like your home practice to bring into your life?
A regular practice requires discipline and commitment. At the same time, a practice is much more likely to remain regular if you enjoy it and if it doesn’t become another TO-DO on your long list. Make your home practice a commitment to yourself and your own self-care. Writing down your intentions can be a powerful way to start and will provide you with a solid container for your practice.
Once your intentions are set, you need to clear some dedicated time and space.
TIME
I personally prefer to do my longest practice in the morning, and 1 or 2 restorative poses in the evening (see earlier post on “winding down at night“). Most importantly, make your practice’s schedule REALISTIC and DOABLE. Don’t start planning on 1 hour each day . 5 or 10 min each day are can have very powerful effects. Set your alarm intentionally for example 10 min before what you usually do. Again, make a commitment to yourself to stick to this length of time. If practicing every day is too much, start with every second day or 5 days a week. Make it work for yourself!
SPACE
Depending on the size of your home, dedicate a space/corner to your practice. Even though there is not enough space for your yogamat to remain unfolded, arrange an area that you can call your own with your rolled mat, 1 or 2 pillows, a blanket, and perhaps a block or a belt. Consider placing a candle or a few small objects that are meaningful to you and invite you to go inwards – just a small table or the end of a shelf can do. Your practice will become easily regular if you make it a “sacred ritual” – a special time to connect to yourself and your body.
Yoga postures
Now that you have your setting and container ready, it is time to design a sequence of poses that fits you. Here is a suggestion for someone who has taken Hatha classes regularly for about six months or more. This sequence (about 10 min long) includes warm ups and poses that will open, strengthen, and stretch the big muscles groups and should leave you feeling fresh and ready for the day.
The rest of the blog is a description of the posture sequence. You can also listen to this guided sequence (16-min long):
(Note that this practice is a mere suggestion and it in no way pretends to be the right practice for your body, your specific needs, conditions, and level of experience with yoga. You should always listen to your body and talk to a certified yoga teacher to determine what the best sequence is for you.)

Gentle warmups
- Find all 4s, on hands and knees (pad your knees with a blanket if needed). Take a few deep breaths. Soften your skin, and let the middle of your shoulder blades melt.
- Press your fingers pads and the four corners of your palm down, tuck your toes under. Slowly move into Cat Cow. Inhale, and move your inner thights back, look forward, gently curve your lower back. Exhale, press your hands further down and away from your knees, draw your belly towards your spine, round your back towards the ceiling. Repeat for a few breaths.
- From all 4s, pull your belly in towards the spine, and move your hips to the left, look towards your left. Then move your hips towards the right, look towards your right.
- Keep your hips above knees, hip-width apart, toes tucked under, and walk your hands forward, shoulder-width apart, to straighten your arms (like a Down Dog on your knees). Press your hands down, gently lift your arm pits up, while melting the middle of your shoulder blades down. Deep breaths on both sides of the ribs, come up on finger tips if you can. Hold for a few breaths.
- Keep your shins and toes engaged and move your butt back to your hills. Stay on finger tips, and slowly move the finger tips to the left. Stretch your whole right side. Hold for a few breaths and move to the right.

Moving towards Sun salutations
- Come back to all 4s, walk your hands forward and your feet back, and lift your knees of the floor for Down Dog (Adho Mukha Svanasana). Keep your knees bent, and widen your feet wider than your hips. Breathe deeply. Pedal your feet (1 knee bent, 1 leg stretched), slowly alternating each leg.
- Walk both feet up to your hands, hip-width apart. Bend your knees, finger tips on the ground, inhale and extend your spine and heart forward, Ardha Uttanasana. Exhale, bow your chest toward your knees, Uttanasana. Repeat a few time.
- In Uttanasana, interlace your fingers onto the lower back, and extend your arms up and over head. Breathe long on both sides of the torso, keep your knees bent and spread your toes.
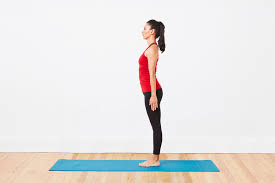
- Hands on your hips, inhale and come all the way up with a straight spine, reach your arms to the sky. Exhale and arms down along your side, tadasana.

Sun Salutations
- Inhale, arms up. Exhale, and bend forward, knees bent, finger tips down on the ground. Inhale look forward, exhale left foot back, low lunge. Exhale, left knee down, squeeze your legs towards each other, and reach your arms high: Anjaneyasana.
- Lift the knee off the ground and step the right foot back to plank, Phalankasana. Hug your forearms towards the midline, inner thighs in and up, and lower down on your belly.
- Inhale, hands next to your chest, baby cobra, Bhujangasana (variation: on finger tips, hand on the floor, 90 degree angle in your arms, elbow pointing up).
- Exhale, lower down, and press back to Adho Mukha Svanasana. After 3 breaths, walk both feet to your hands, inhale, Ardha Uttanasana, exhale, repeat on the other side (right foot back – left foot forward).
Repeat once or twice. Possible variations: High lunge (back knee off the ground) or warrior 1 (back hill down, pointing externally at 45 degree) instead of Anjaneyasana.

Hip Openers – Other Standing Poses
Let’s get into our hips.
Stand in Tadasana. Hands on your hips, left foot back, place the left hill on the ground, left foot parallel to the short end of the mat. Warrior 2/Virabradhasana 2. Extend your arms to the sides, parallel to the floor, looking at your right hand. Inhale both side ribs long, exhale and soften your front knee towards a 90-degree angle. Squeeze your legs to the midline, stick your butt back more, and wrap your right buttock under your seat bone to keep your hips open. From the earth, draw energy all the way up into your heart, and from your heart extend in all directions.
Keep this position in your hips, and strengthen your front leg. Lower your right hand onto a block or the floor outside of your right foot, left hand to the sky. Trikonasa. Breathe, and tuck your tailbone under your right buttock more. Suck energy up through your legs and from your pelvis reach out to your heart and in all directions.
Both hands down, step your left foot forward and change sides. (or change throught Adho Mukha Svanasana).
Alternative or additional hip opener: Eka Padha Rajakapotasana, Pigeon prep. From Down Dog/Adho Mukha Svanasana, left knee foward to left wrist, left foot on the mat, pointing down, close to your right groin. Right knee down, right toes tucked under, squeeze towards the midline. Lower onto your forearms, and soften the space behind your heart. Continue to squeeze your knees towards one another, and keep your hips square and parallel to the front edge of the mat. Push back into Adho Mukha Svanasana and repeat, now with the right knee forward.

If this is part of your pratice, go to a wall and practice hand stand: Adho Mukha Vrksasana.
Winding down & Savasana
From Adho Mukha Svanasana, find Balasana: knees wide onto the mat, big toes together, butt back towards your hills. Breathe deeply, and let the skin on your back soften on each exhale. Take 5 deep breathes here.
Push back into all 4s, and roll onto your back for a brief savasana. Let your body be heavy, and soften completely. After a few minutes, when you feel ready, roll onto your right side, and bring yourself up to a sitting position.
Try not to skip savasana! I know , it does not seem to count beacuse not “physical”, but savasana is important as it allow your muscles and entire system to release and integrate your practice. Always finish with savasana, even only for 3 breathes.

If/when your schedule allows it, take a short sit and meditate for 5, 15, or 30 min… Acknowledge yourself for your practice, and get ready for your day.
Namaste
Cedric
All right reserved, HeartWise Yoga. To use this content please cite the source accordingly. Namaste.
![]()